Using KubeAI to deploy Nous Research's Hermes 3 and other LLMs#
Introduction#
See our video tutorial on using KubeAI to deploy Nous Research's Hermes 3 and other LLMs.
KubeAI: Private Open AI on Kubernetes is a Kubernetes solution for running inference on open-weight large language models (LLMs), including Nous Research's Hermes 3 fine-tuned Llama 3.1 8B model and NVIDIA's Nemotron fine-tuned Llama 3.1 70B model.
Using model servers such as vLLM and Ollama, KubeAI enables you to interact with LLMs using both a web UI powered by Open WebUI and an OpenAI-compatible API.
In this tutorial, you'll:
- Stand up a single-node Kubernetes cluster on an 8x H100 on-demand instance using K3s.
- Install the NVIDIA GPU Operator so your Kubernetes cluster can use your instance's GPUs.
- Deploy KubeAI in your Kubernetes cluster to serve both Nous Research's Hermes 3 model and NVIDIA's Nemotron model.
- Interact with the models using KubeAI's web UI.
- Interact with the models using KubeAI's OpenAI-compatible API.
- Use NVTOP to observe GPU utilization.
Stand up a single-node Kubernetes cluster#
-
Use the dashboard or Cloud API to launch an 8x H100 instance. Then, SSH into your instance by running:
Replace
<INSTANCE-IP-ADDRESS>with the IP address of your instance.Note
The
-L 8080:localhost:8080option enables local port forwarding. Local port forwarding is needed to securely access KubeAI's web UI from your computer. See the SSH man page to learn more. -
Install socat (which is needed for the
kubectl port-forwardcommand you'll run later in this tutorial) by running: -
Install K3s (Kubernetes) by running:
-
Verify that your Kubernetes cluster is ready by running:
You should see output similar to:
Tip
You can enable tab completion for kubectl by running:
Install the NVIDIA GPU Operator#
-
Install the NVIDIA GPU Operator in your Kubernetes cluster by running:
-
In a few minutes, verify that your instance's GPUs are detected by your cluster by running:
You should see output similar to:
nvidia.com/cuda.driver-version.full=535.129.03 nvidia.com/cuda.driver-version.major=535 nvidia.com/cuda.driver-version.minor=129 nvidia.com/cuda.driver-version.revision=03 nvidia.com/cuda.driver.major=535 nvidia.com/cuda.driver.minor=129 nvidia.com/cuda.driver.rev=03 nvidia.com/cuda.runtime-version.full=12.2 nvidia.com/cuda.runtime-version.major=12 nvidia.com/cuda.runtime-version.minor=2 nvidia.com/cuda.runtime.major=12 nvidia.com/cuda.runtime.minor=2 nvidia.com/gfd.timestamp=1729173628 nvidia.com/gpu-driver-upgrade-state=upgrade-done nvidia.com/gpu.compute.major=9 nvidia.com/gpu.compute.minor=0 nvidia.com/gpu.count=8 nvidia.com/gpu.deploy.container-toolkit=true nvidia.com/gpu.deploy.dcgm=true nvidia.com/gpu.deploy.dcgm-exporter=true nvidia.com/gpu.deploy.device-plugin=true nvidia.com/gpu.deploy.driver=pre-installed nvidia.com/gpu.deploy.gpu-feature-discovery=true nvidia.com/gpu.deploy.mig-manager=true nvidia.com/gpu.deploy.node-status-exporter=true nvidia.com/gpu.deploy.operator-validator=true nvidia.com/gpu.family=hopper nvidia.com/gpu.machine=Standard-PC-Q35-ICH9-2009 nvidia.com/gpu.memory=81559 nvidia.com/gpu.mode=compute nvidia.com/gpu.present=true nvidia.com/gpu.product=NVIDIA-H100-80GB-HBM3 nvidia.com/gpu.replicas=1 nvidia.com/gpu.sharing-strategy=none nvidia.com/mig.capable=true nvidia.com/mig.config=all-disabled nvidia.com/mig.config.state=success nvidia.com/mig.strategy=single nvidia.com/mps.capable=false nvidia.com/vgpu.present=false nvidia.com/gpu-driver-upgrade-enabled: truenvidia.com/gpu.count=8indicates that your cluster detects 8 GPUs.nvidia.com/gpu.product=NVIDIA-H100-80GB-HBM3indicates that the detected GPUs are NVIDIA-H100-80GB-HBM3 GPUs.
Install KubeAI#
-
Install KubeAI by running:
cat <<EOF | kubectl apply -f -
apiVersion: v1
kind: Namespace
metadata:
  name: kubeai
---
apiVersion: helm.cattle.io/v1
kind: HelmChart
metadata:
  name: kubeai
  namespace: kubeai
spec:
  repo: https://www.kubeai.org
  chart: kubeai
  targetNamespace: kubeai
EOF
Ths installation usually takes 2 to 3 minutes to finish.
-
To know when KubeAI is installed and ready, run:
This command watches for and displays pods running in the
kubeainamespace.KubeAI is installed and ready once you see output similar to:
Note
1/1which indicates 1 pod out of the 1 requested is ready. -
To stop watching, press Ctrl + C.
Download and serve the Hermes 3 and Nemotron models#
-
Download and serve both Nous Research's Hermes 3 model and NVIDIA's Nemotron model using vLLM by running:
cat <<EOF | kubectl apply -f -
apiVersion: kubeai.org/v1
kind: Model
metadata:
  name: hermes-3-llama-3.1-8b
  namespace: kubeai
spec:
  features: [TextGeneration]
  owner: NousResearch
  url: hf://NousResearch/Hermes-3-Llama-3.1-8B
  engine: VLLM
  resourceProfile: nvidia-gpu-h100:1
  minReplicas: 1
---
apiVersion: kubeai.org/v1
kind: Model
metadata:
  name: llama-3.1-nemotron-70b-instruct
  namespace: kubeai
spec:
  features: [TextGeneration]
  owner: nvidia
  url: hf://nvidia/Llama-3.1-Nemotron-70B-Instruct-HF
  engine: VLLM
  resourceProfile: nvidia-gpu-h100:4
  minReplicas: 1
  args:
    - --tensor-parallel-size=4
EOF
Note
The Hermes 3 model can be loaded onto a single GPU. Accordingly,
spec.resourceProfileis set tonvidia-gpu-h100:1to allocate a single GPU to the Hermes 3 model.On the other hand, the Nemotron model can't be loaded onto a single GPU. Accordingly,
spec.resourceProfileis set tonvidia-gpu-h100:4to allocate 4 GPUs to the Nemotron model. Also, the argument--tensor-parallel-size=4is passed to vLLM to divide the Nemotron model among the 4 allocated GPUs using a tensor parallelism strategy.See vLLM's documentation on distributed inference and serving to learn more.
-
To know when the models are downloaded and being served, run:
-
The models are downloaded and being served once you see output similar to.
model-hermes-3-llama-3.1-8b-79cdb64947-cb7cd             1/1     Running   0          2m21s
model-llama-3.1-nemotron-70b-instruct-57cf757d9d-nc9l4   1/1     Running   0          5m5s
Note
1/1for each model, which indicates 1 pod out of the 1 pod requested for each model is running. -
To stop watching, press Ctrl + C.
Interact with the models using KubeAI's web UI#
-
Run the following command to make the KubeAI web UI accessible from your computer:
-
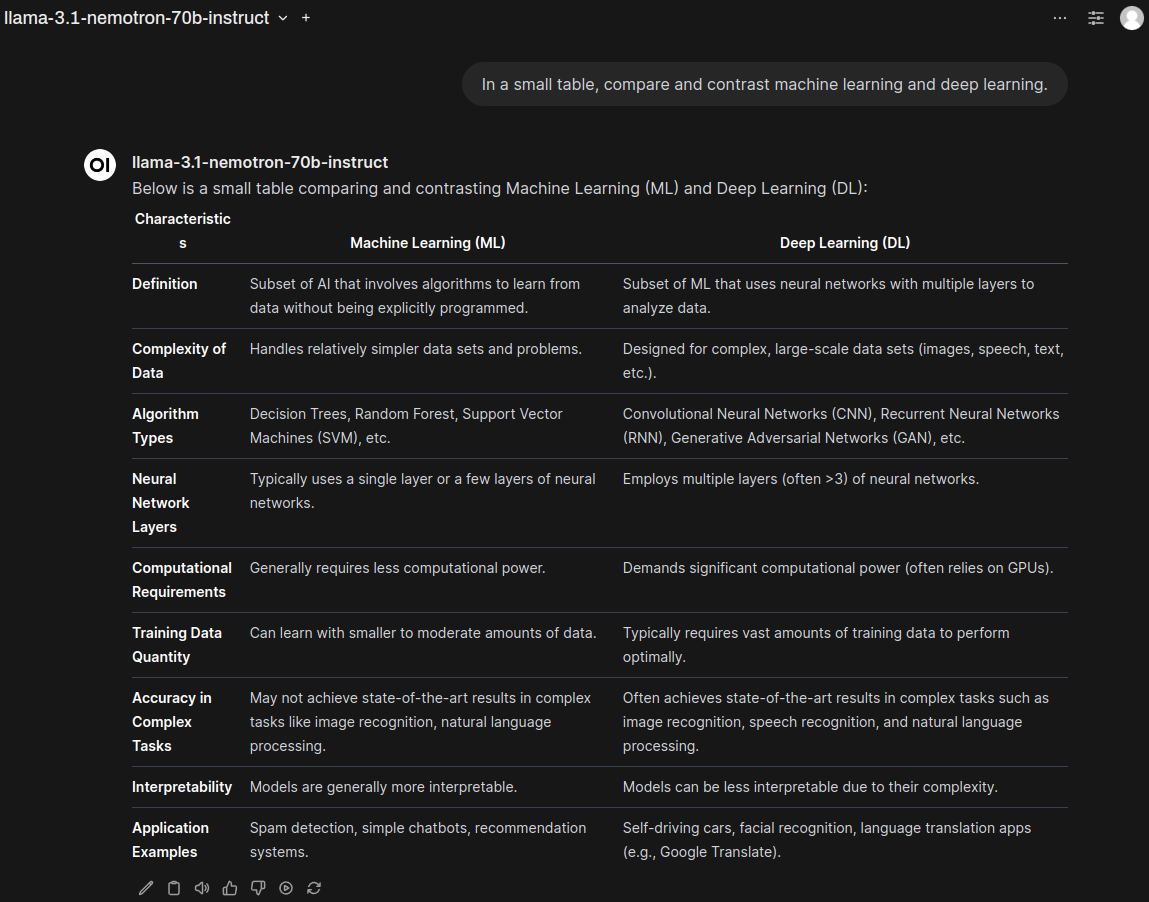
In your web browser, go to http://localhost:8080. Then, at the top-left of the page, click Select a model and choose either:
- hermes-3-llama-3.1-8b for the Hermes 3 model.
- llama-3.1-nemotron-70b-instruct for the Nemotron model.
-
At the bottom of the page, in the Send a Message field, enter a prompt to test the chosen model, for example:
You should see output similar to:
Interact with the models using KubeAI's OpenAI-compatible API#
-
On your instance, install
curlandjqby running: -
Enable access to KubeAI's OpenAI-compatible API by running:
-
List the models KubeAI is serving using the API's
/modelsendpoint by running:You should see output similar to:
{ "object": "list", "data": [ { "id": "llama-3.1-nemotron-70b-instruct", "created": 1729174478, "object": "model", "owned_by": "nvidia", "features": [ "TextGeneration" ] }, { "id": "hermes-3-llama-3.1-8b", "created": 1729174478, "object": "model", "owned_by": "NousResearch", "features": [ "TextGeneration" ] } ] } -
Submit an example prompt to the API by running:
curl -sS -d @- http://localhost:8081/openai/v1/completions -H "Content-Type: application/json" <<EOF | jq .
{
  "model": "llama-3.1-nemotron-70b-instruct",
  "prompt": "Machine learning engineers are ",
  "temperature": 0
}
EOF
In the above example, the Nemotron model is responding to the prompt
Machine learning engineers are.You should see output similar to:
{
  "id": "cmpl-04a8ee4abf7247b5859755e7684ade21",
  "object": "text_completion",
  "created": 1729179938,
  "model": "llama-3.1-nemotron-70b-instruct",
  "choices": [
    {
      "index": 0,
      "text": "2023’s most in-demand tech professionals\nAccording to a new report from Indeed",
      "logprobs": null,
      "finish_reason": "length",
      "stop_reason": null,
      "prompt_logprobs": null
    }
  ],
  "usage": {
    "prompt_tokens": 6,
    "total_tokens": 22,
    "completion_tokens": 16
  }
}
Use NVTOP to observe GPU utilization#
-
On your instance, run:
You should see output similar to:
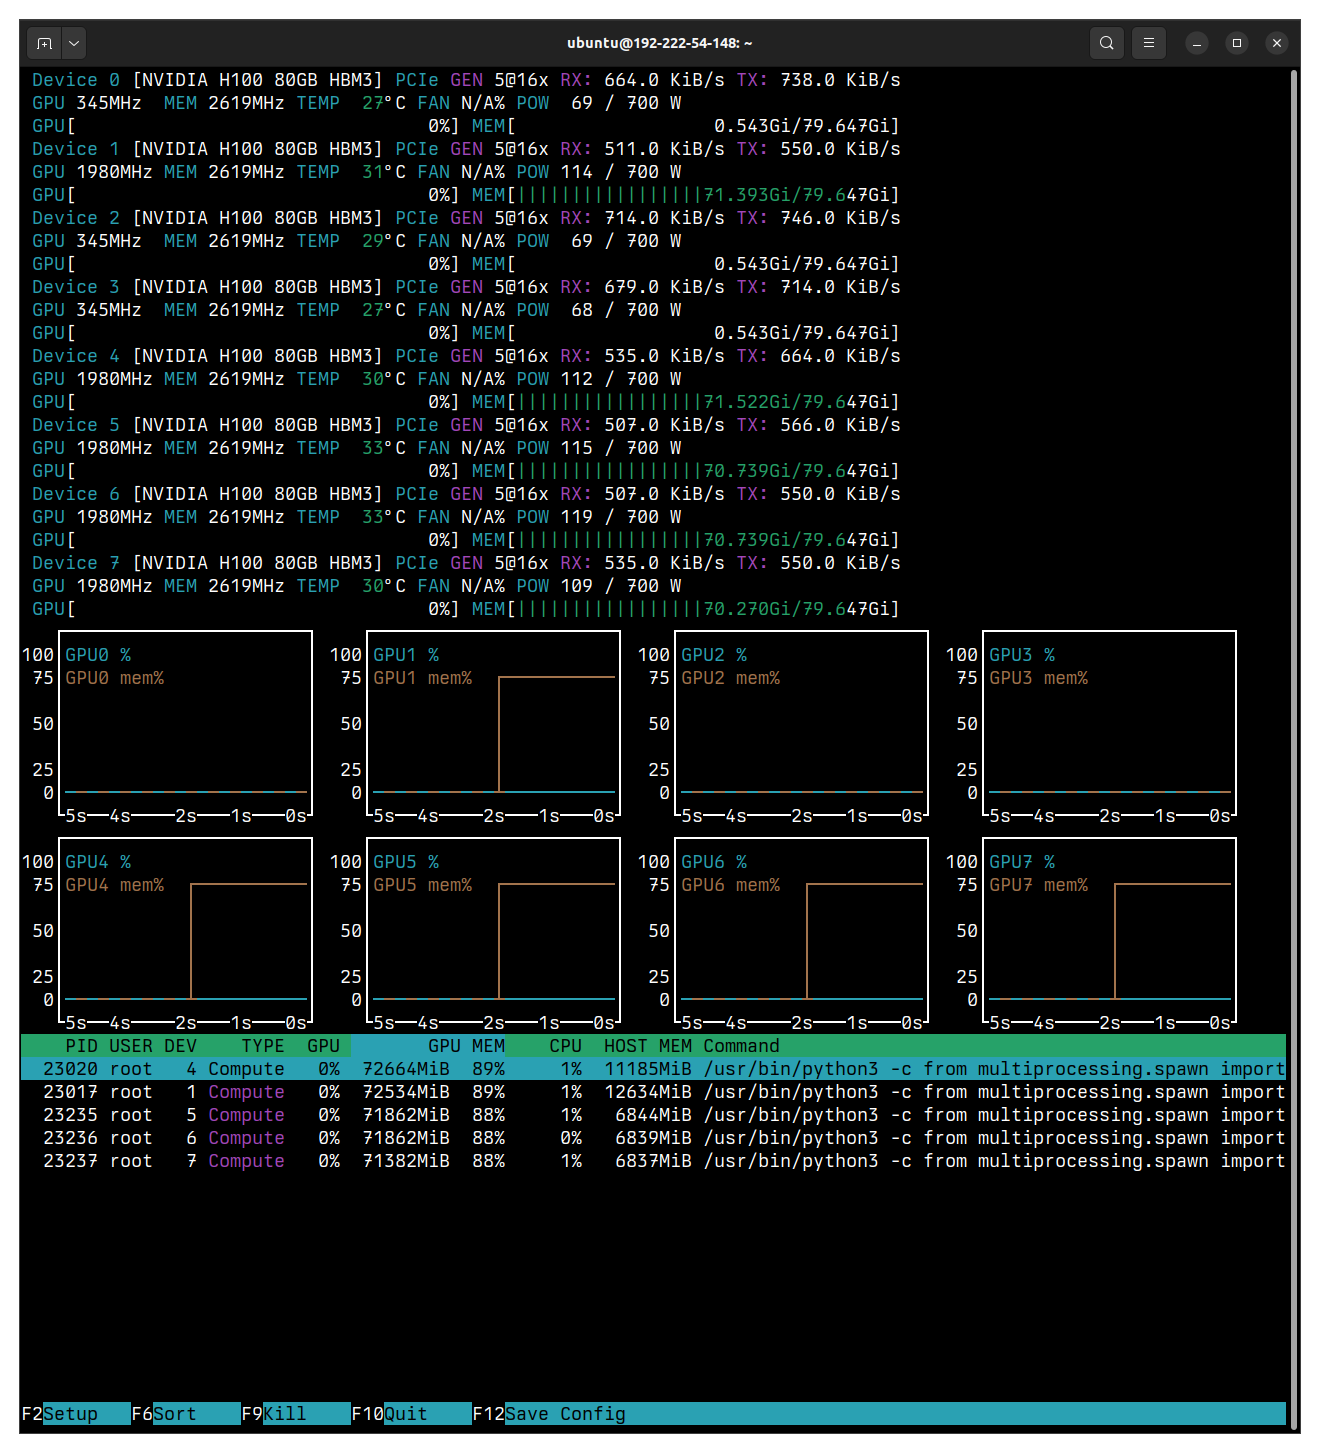
The above example output shows the models are loaded on:
GPU1GPU4GPU5GPU6GPU7
Note the memory usage.
The output further shows the following GPUs are unallocated and can be used for other work:
GPU0GPU2GPU3
Again, note the memory usage or, in this case, the lack of memory usage.
-
In your browser, go again to http://localhost:8080. Select the
llama-3.1-nemotron-70b-instructmodel. -
Enter an example prompt, such as:
In
nvtop, you should see output that momentarily looks like: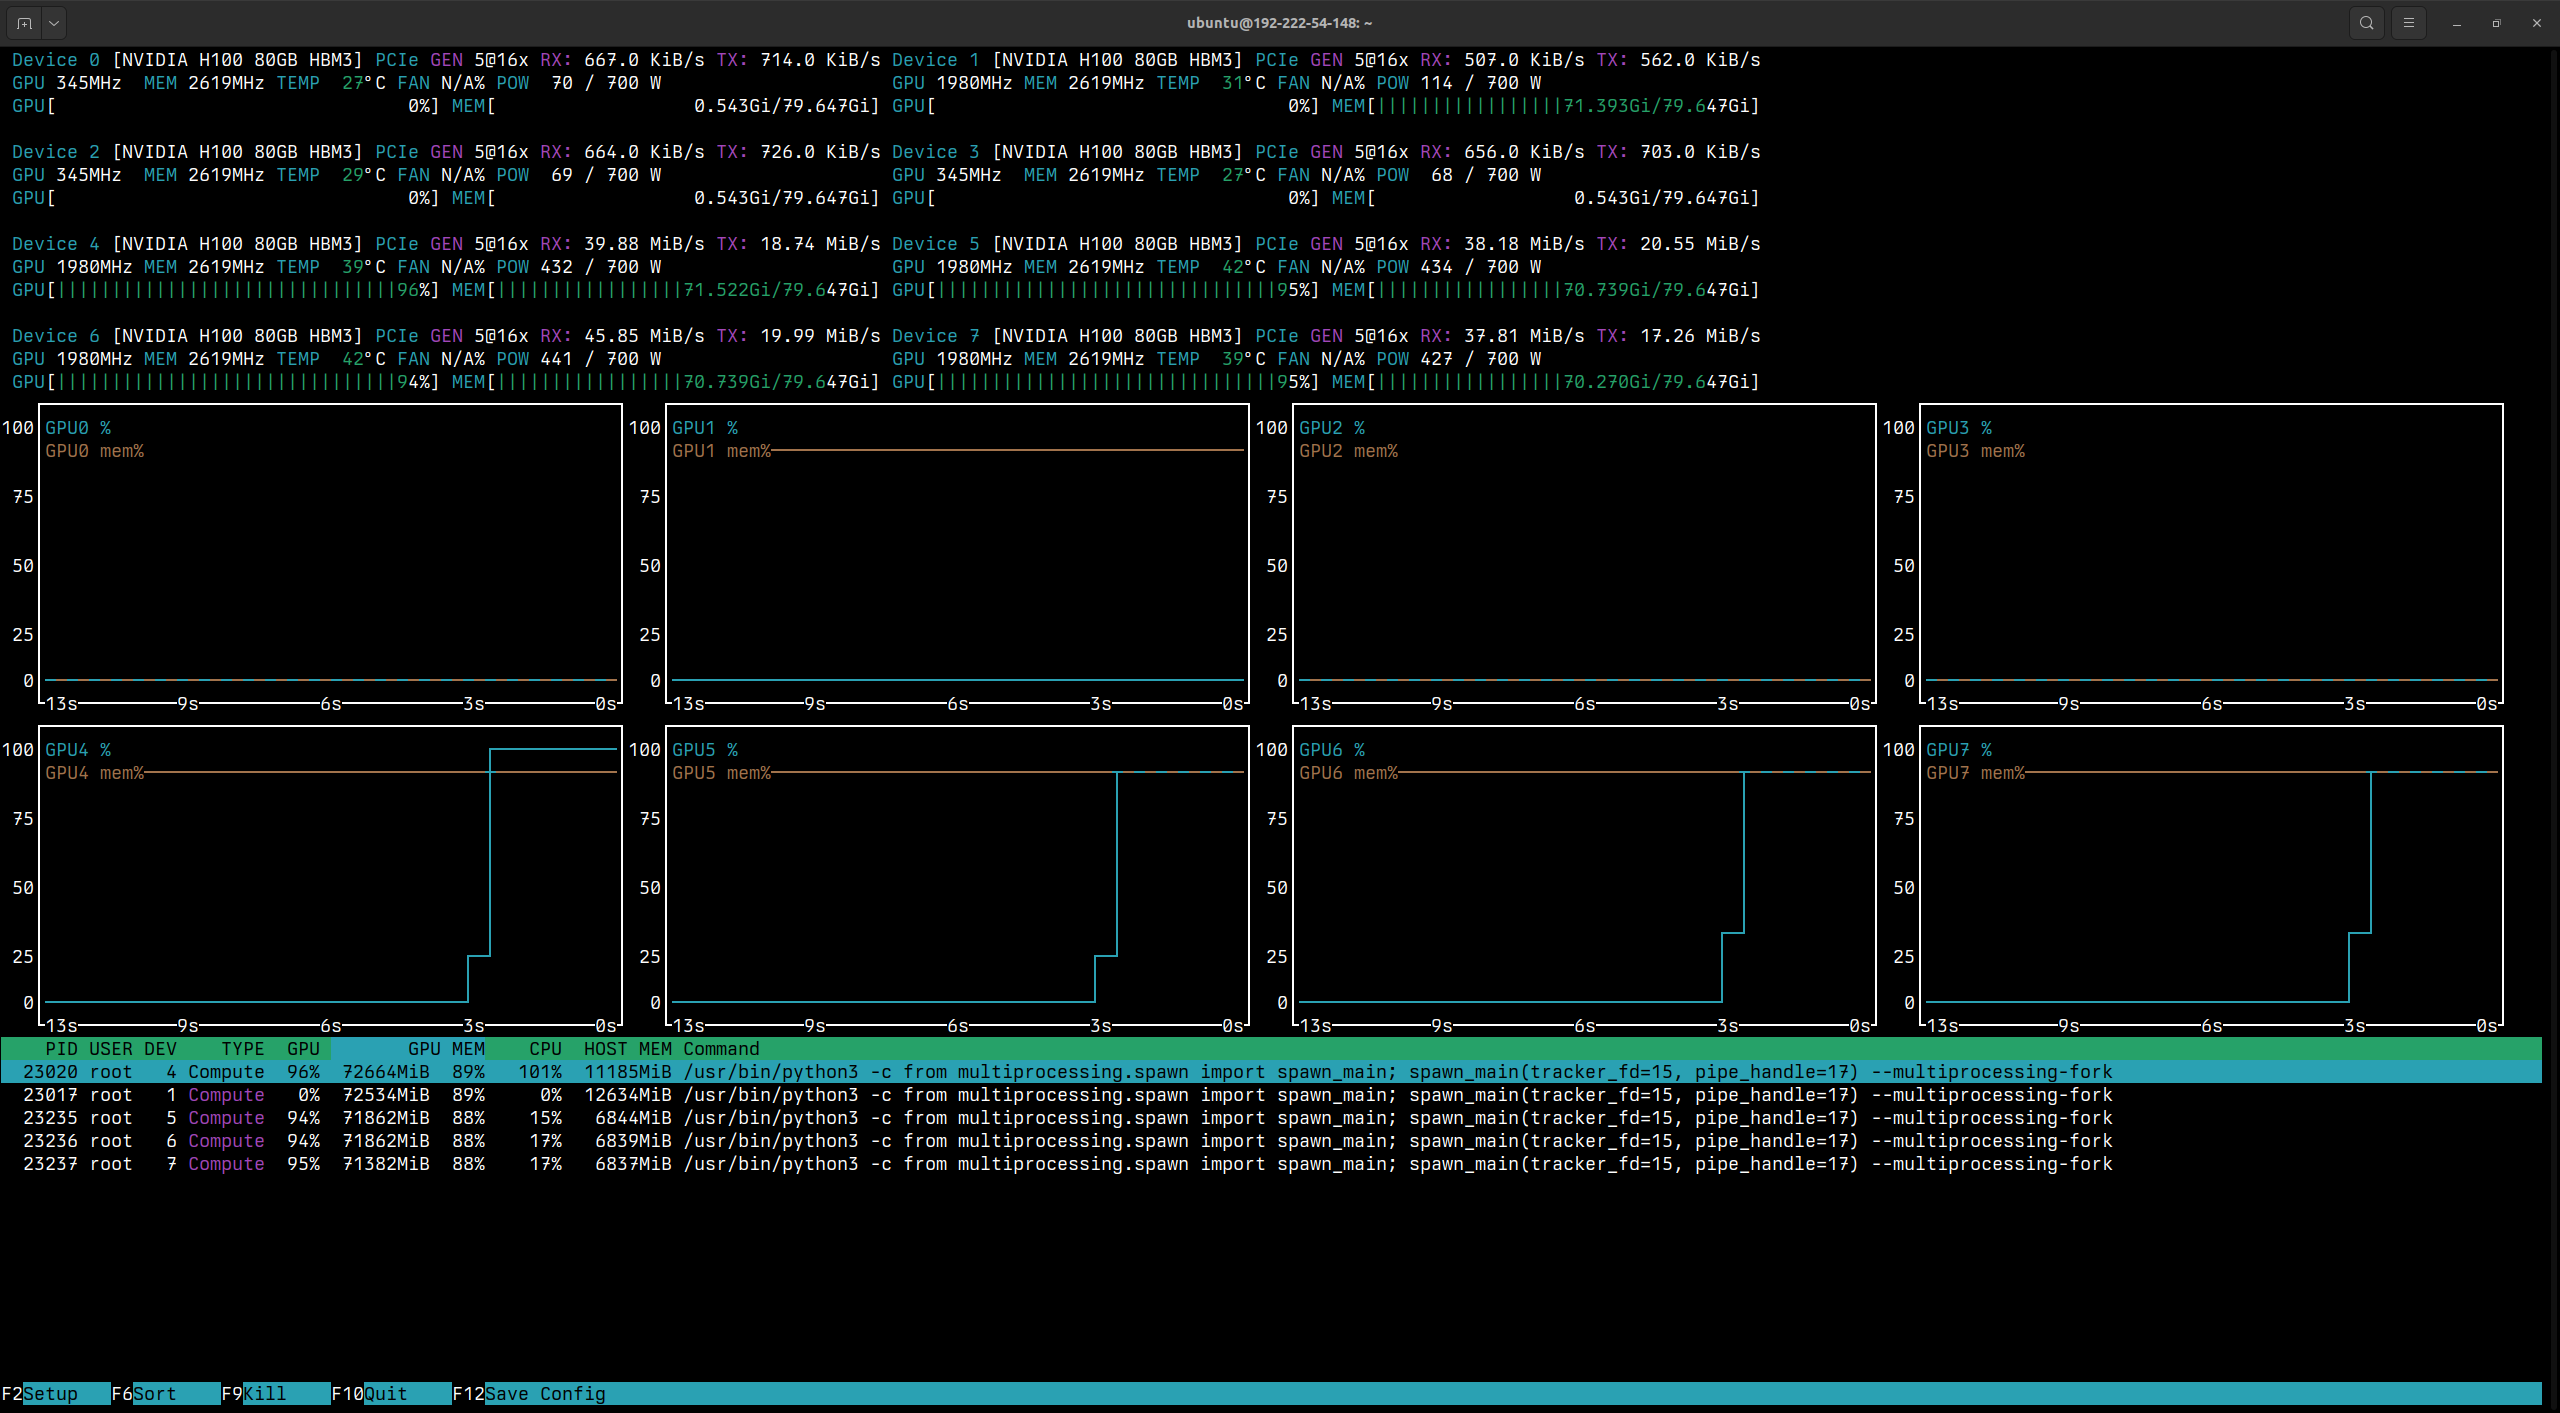
The output shows that
GPU4throughGPU7are utilized for running inference on the Nematron model. -
In your browser, select the
hermes-3-llama-3.1-8bmodel and enter the same prompt. You should see output that momentarily looks like: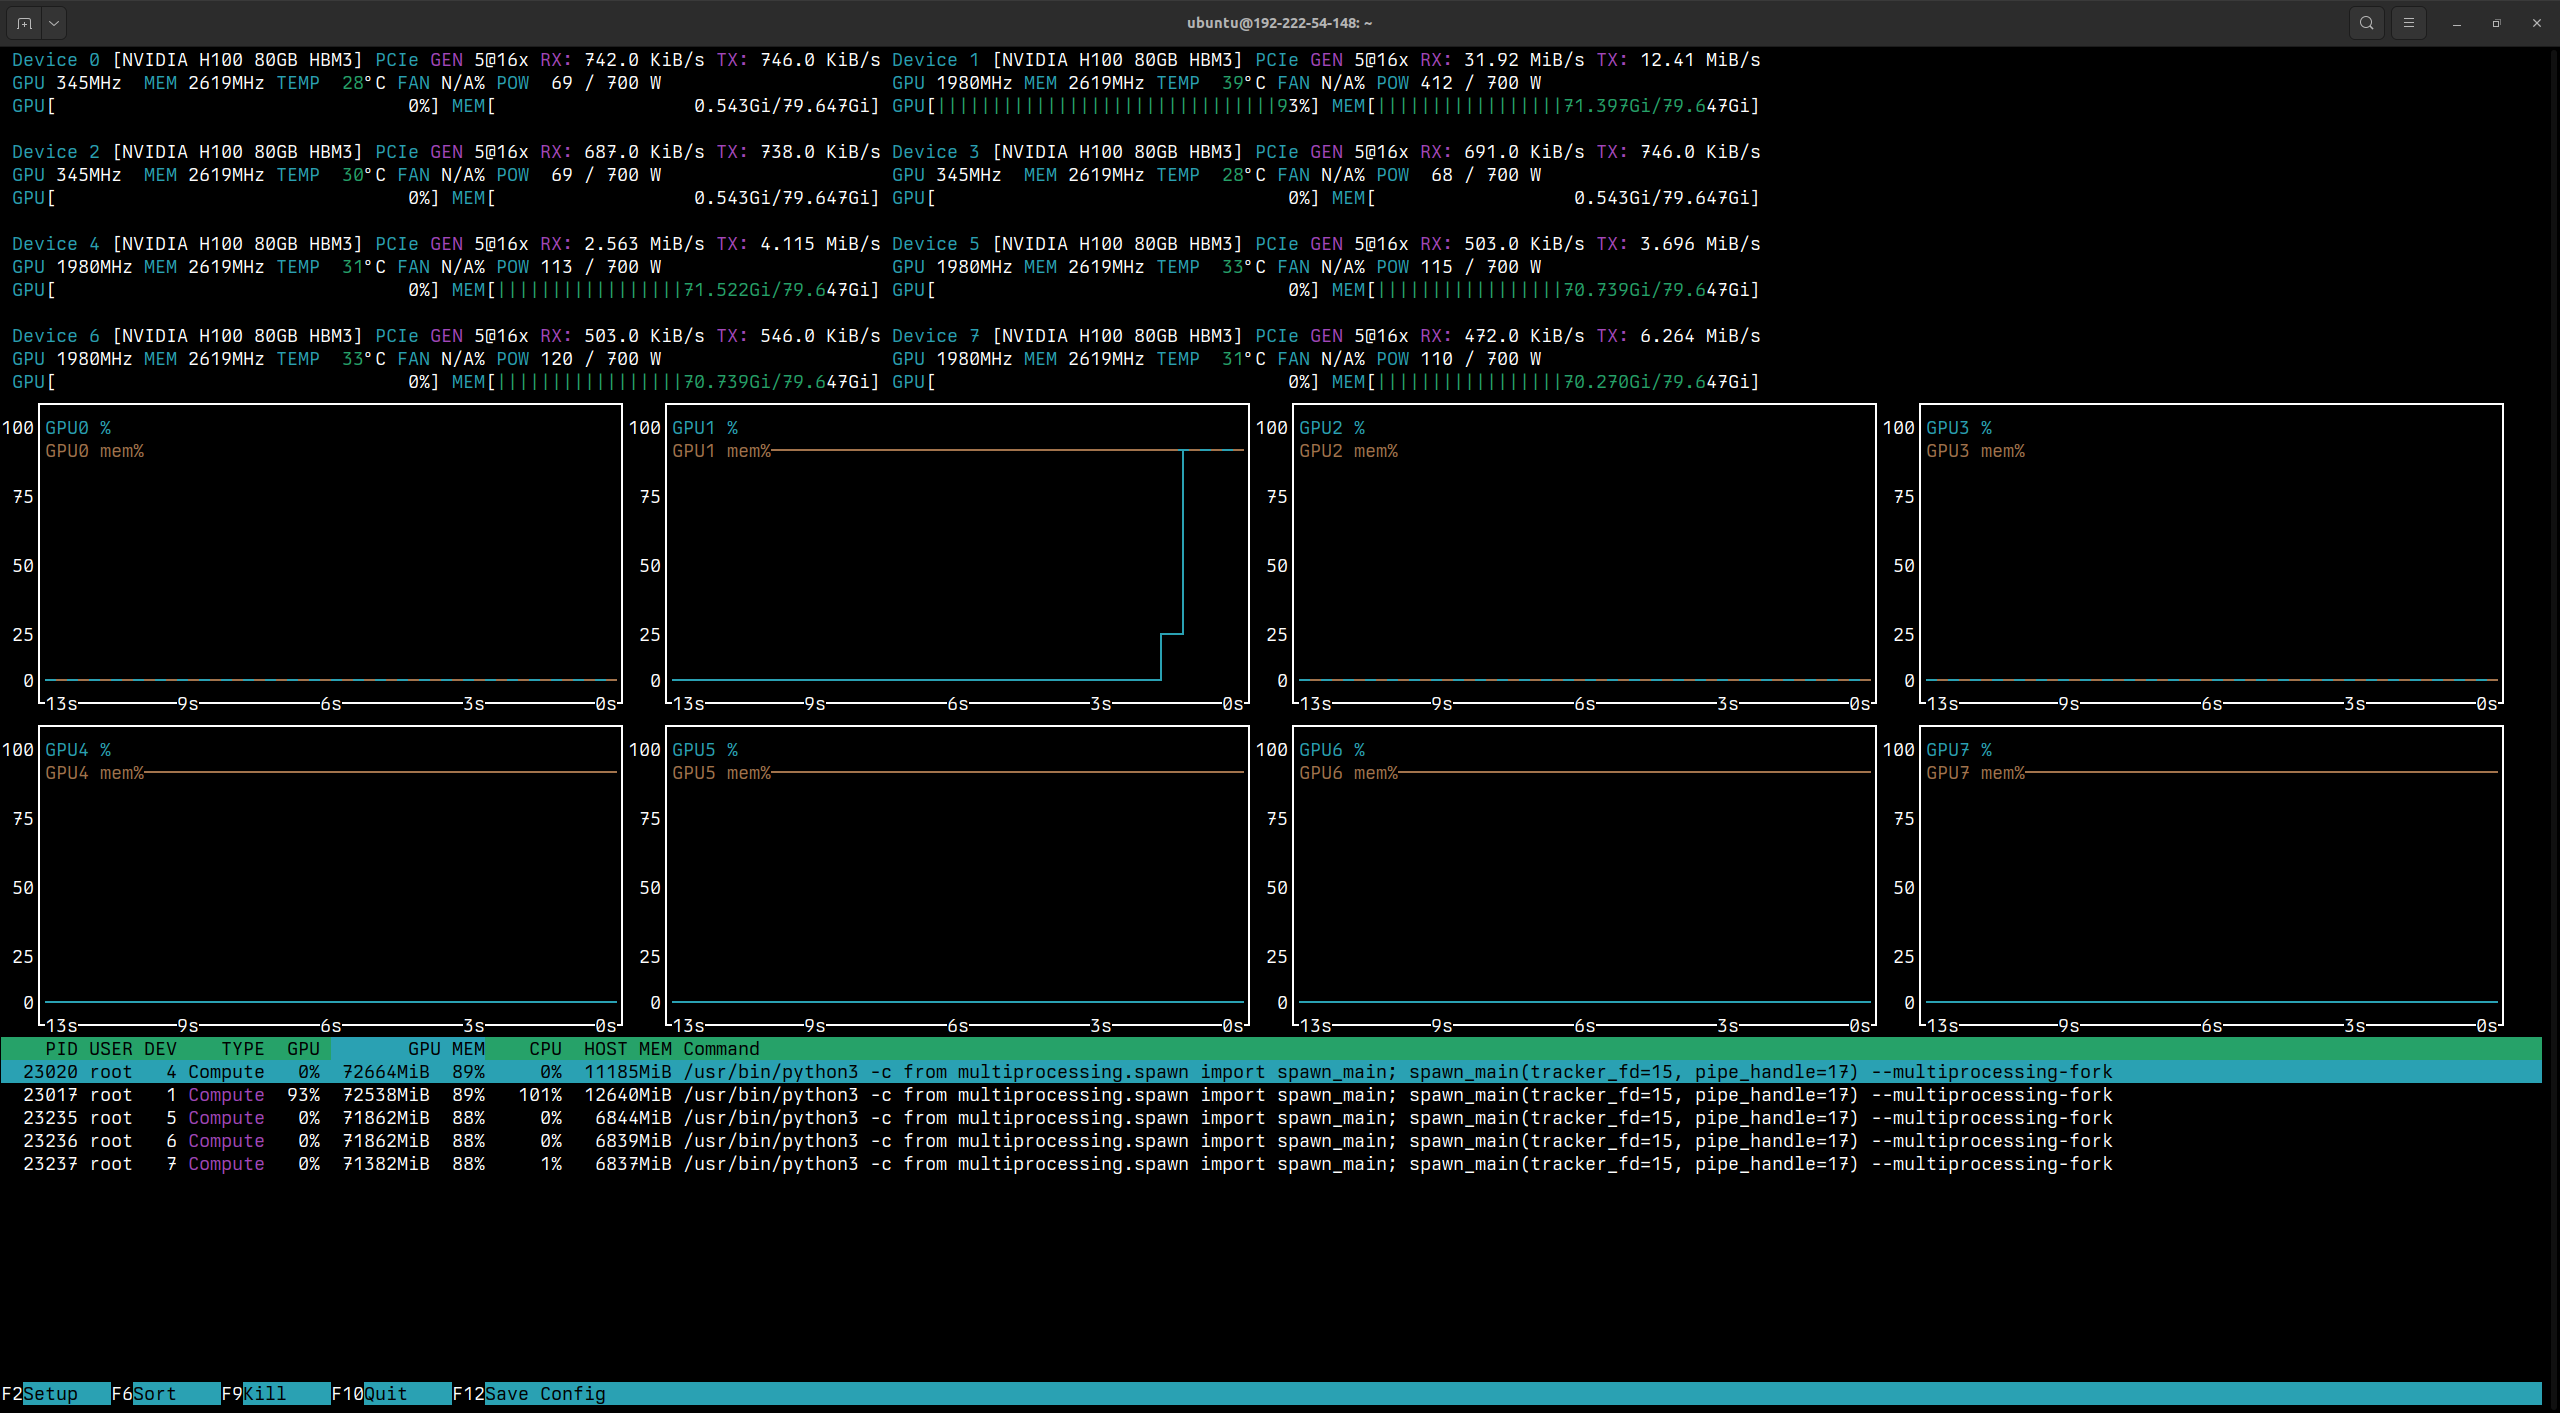
The output shows that
GPU1is utilized for running inference on the Hermes 3 model.